Corel Painter
Saving properties
jpeg, psd, png
Shift +S -cycle between two colors
paletton.com
save to tiff file format and later open with Photoshop.
Showing posts with label BVA 142. Show all posts
Showing posts with label BVA 142. Show all posts
Friday, 21 June 2019
Wednesday, 19 June 2019
week 14
Class is all about catching up with our assignment for BVA142 paper.
How to export format in Maya
after you finish your model, file saveas> .mb extension(Maya binary) save
don't make a modification at this point
Export all> name your file>file type job export.
drag and deop those last three files onto it. obj, mb,mtl
How to export format in Maya
after you finish your model, file saveas> .mb extension(Maya binary) save
don't make a modification at this point
Export all> name your file>file type job export.
drag and deop those last three files onto it. obj, mb,mtl
Digital painting concepts
working on Digital painting.
Building up concepts and developing ideas with imagination.
In this picture, I try to create stone structures and mountains. Its just a concept art for my paintings. I still need to come up with various ideas regarding my previous topic.
Style and Influence:

Video Referece: https://www.youtube.com/watch?v=hP5yTcK7b8Y
week 16


https://www.youtube.com/watch?v=fj-10lIrboM
https://www.youtube.com/watch?v=Bi06uyrdpFs&t=326s
Assessment II


Saturday, 8 June 2019
AutoDesk maya practice
What I did today.
1.Imported scene or reference image.
2 got to know about layer properties in Maya.
3. Extruding faces
3.multi-cut, These tools are for modeling purposes and can be found in the Modeling Tool kit.
somehow managed to create a final product for my chess piece.
An image below is the prototype for my chess piece. This is a temple where two wheels are attached


Rendering in Maya using Arnold Renderer.

Reference:
https://docs.arnoldrenderer.com/display/AFMUG/Rendering+Your+First+Scene
https://youtu.be/ooPLTN_1p6A
q=copy+and+paste+model+in+maya&rlz=1C1GCEB_en&oq=copy+and+paste+model+in+maya&aqs=chrome..69i57j0l5.5103j0j7&sourceid=chrome&ie=UTF-8#kpvalbx=1
Wednesday, 5 June 2019
Chess Piece design
Making chess piece for my second Assignment ( BVA 142)
Prototype 1.
I have a concept of making a temple-like structure in Maya. Since I'm using Maya for the first time, I might struggle to execute it properly. I will stick with only basic instructions.
This is a simple prototype which I'd like to consider it as a Bishop in Chess. I have drawn using paint tools in Microsoft Windows since I don't have the luxury to draw in Wacom and I don't carry smartphones.
It has two wheels and cannot move of its own. It resembles more like a cart but Its structure is like a temple.
I'm very excited to print it as a 3d object. I think this prototype can be easily created for beginner 3d artists like myself.
Week 15
Adobe InDesign.
page set up for printing.
make sure the last page is multiple of 4.
you can drag page to other page and create a new slide
add a page to your file.
T stands for type tool.
In font option you can select various fonts, Those fonts with arrows on it have more option on it.
Pick fonts that look professional and be carefully selecting it.
Text alignment is available, you may use it to place in the correct form.
insert special characher> markers> current page number.
After creating it there appears an alphabet A.
The first and last pages stand for front and back cover.
Page 2 is the inside front Cover.
You can have a contex page if you want.
Do not use .ril file type while importing the image.
Be careful while
viewing in low resolution can help you run the program fast.
Work in your single file while working.
Kaleidoscope
Working on Kaleidoscope
Kaleidoscope 1
Learning Corel Pinter is completely new for me. And I'm glad that we have been taught this semester.
Here is the final output of my Kaleidoscope.

For this image, I simply dissolved the black background for a different look. And I'm satisfied with this one. originally this image would look like this,

I started with very basic drawing with various brush strokes for different color selection.
Kaleidoscope 2

This is my second painting for my portfolio. I wanted to try a different style of painting with some vibrant colors. This is the first painting I've done so far on the computer. My experience is not bad at all. It's very convenient to draw and software tools are very effective. Especially with Adobe Corel Painter, I feel comfortable using it.
I will try to implement all the tools and techniques that have been taught in class in my future endeavors.
Tuesday, 4 June 2019
Working on my digital paintings.
I try to imagine and create this image as I go along,
Lots of erasing and correction were made in the process.
For this image, I got the concept from cartoon movies and some of the good sample of digital paintings done by professionals online. Here I have added some rocky mountains with trees. and I decided to put the sun, which will be creating some hazy sort of scene.
Later I painted with some color. and here is my color palette for this particular image.


I try to imagine and create this image as I go along,
Lots of erasing and correction were made in the process.

For this image, I got the concept from cartoon movies and some of the good sample of digital paintings done by professionals online. Here I have added some rocky mountains with trees. and I decided to put the sun, which will be creating some hazy sort of scene.
Later I painted with some color. and here is my color palette for this particular image.

After completing with a painting I get this image,

This is how far I have gone till now. and I still need to work on other digital paintings as my part of the assignment. For a bit up taste, I have put some Uniform grain and zoom the front mountain a little.

Some of my inspirational image from the website are as follows:


Monday, 27 May 2019
Assessment I
Preparation of Assessment I
Mountains and jungles where temples and other infrastructures are located.
This would be more like compositing and matte painting, that it would like to
learn in Photoshop.
Magician and legendary filmmaker Georges Méliès used the matte painting technique in many of his films. "In his 1898 film Un Homme de Têtes – Four Heads Are Better Than One. Méliès would use a glass pane painted black to create a matte. When shooting on film, the black matte kept light from reaching the camera. Since a portion of the film was not exposed to light,
it would leave part of the frame empty."
In-depth, It should look realistic in terms of a perspective view, color grade,
Lens distortion
Matte Painting: A matte painting is a painted representation of a landscape, set, or distant location that allows filmmakers to create the illusion of an environment that is not present at the filming location.
Digital Painting:

Artist Influence:
Georges Melies- was a French illusionist and film director who led many technical and narrative developments in the earliest days of cinema. Méliès was well-known for the use of special effects.
A Trip to the Moon (1902), The impossible voyage.
Saby Menyhei: is a skilled and versatile artist industry with projects under his belt like Rouge One: A Star Wars Story, Thor: The Dark World, Jason Bourne and many more (IMDB)
BaM animation- Youtube.
What I've included in my blog.


These images were searched on the Internet and later compiled together using Adobe Photoshop.
References
online Learning sites.
https://www.rocketstock.com/blog/visual-effects-matte-paintings-composited-film/
Wednesday, 22 May 2019
week 13
Rendering in Autodesk Mudbox.


First, go to "save screen image"
or create
Rendering in Maya
a couple of years they used to use mental ray, nowadays we render with Arnold Renderer.
isn't user-friendly in terms of light
Render the current view(looks like a film reel)
win- setting a preference, plug-in manager, uncheck one of the buttons.
Arnold Rendering

We can also render in a different perspective for our models and that we simply do by following.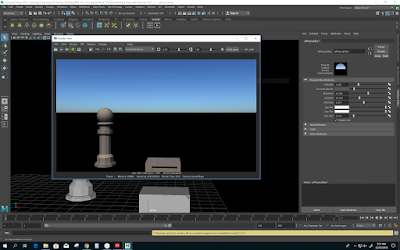


Normally Resolution for printing is 300 DPo.
>Save image> select a file type>Save to destination folder.
Rendering my Model in 4k Setting.

Creating your own Chess Piece
Tuesday, 21 May 2019
Rename your file with 0001 which will be easy for new version saving or increment saving.
Structure your folder.
object list and turn on/off eye button to show the current view

Controls
Alt + Left button will rotate the scene
Alt + Middle mouse button will roll inwards and outwards.(dolly in dolly out)
Alt + Right mouse button will zoom
Alt + Middle mouse click will pan around

Display:
All your models better be in quads for animation ( good for texture ) no issues.
The gaming engine might be different.
Shift +L flat lighting
alt +L dark lighting
Rename light in the object list.
Light Properties:
Diffuse: the color of the light (try work for a neutral color for key light color)
Locked to camera : select/ deselect
Layers
Sculpt
page up, page down
Bumpmap grayscale texture
In sculpt tools you can find a Imprints option which lets put the texture to your element.
Get Mudbox software at the Autodesk website. You need to create an account and sign in.
Creating Joins for body
Go to pose tool and use a joint tool to create jointly.
pose tool allows you to
Paint tool
Create a paint layer:
Stencil: press and mouse buttons for further transition.
Week 12
Maya Class With Michael
I am always interested to learn Autodesk's Maya Software for 3D animation and today seems to be a perfect day to learn in depth for a beginner.
perspective (4 windows)
spacebar for selection for particular panel

Keyboard shortcuts :

Attributes editor
less polygon is better for animation, this makes an image to appear less smooth and efficient in terms of render previewing.
Object mode
not to do this thing, extrude and do nothing. ( Be aware)
Excluding both sides at once
G key shortcuts for tools used before
Press F for outliner
control for deselect
Hold shift and double click to select every vertex and edges. ( multiple selections)
Transform attributes
Go to custom tab save
Save and reset to your original transformation. It is very important.
shift, control, and select
Modify freeze transformation
next week task, come up with a sketch or prototype of what you want to create for your projects.
I am always interested to learn Autodesk's Maya Software for 3D animation and today seems to be a perfect day to learn in depth for a beginner.
- First of all, it is important to Set a project.
perspective (4 windows)
spacebar for selection for particular panel

Keyboard shortcuts :

Attributes editor
less polygon is better for animation, this makes an image to appear less smooth and efficient in terms of render previewing.
Object mode
not to do this thing, extrude and do nothing. ( Be aware)
Excluding both sides at once
G key shortcuts for tools used before
Press F for outliner
control for deselect
Hold shift and double click to select every vertex and edges. ( multiple selections)
Transform attributes
Go to custom tab save
Save and reset to your original transformation. It is very important.
shift, control, and select
Modify freeze transformation
next week task, come up with a sketch or prototype of what you want to create for your projects.
Reference:
For keyboard Shortcuts: https://www.lifewire.com/maya-training-keyboard-shortcut-cheat-sheet-2137Wednesday, 10 April 2019
digital drawin/ phootoshop
Corel Painter
Saving properties
jpeg, psd, png
Shift +S -cycle between two colors
paletton.com
save to tiff file format and later open with Photoshop.
Keyboard Shortcuts.


Saving properties
jpeg, psd, png
Shift +S -cycle between two colors
paletton.com
save to tiff file format and later open with Photoshop.
Keyboard Shortcuts.


Subscribe to:
Comments (Atom)

-
 Here is a quick short video clip I found on the internet, which I find interesting and helpful for my learning. Film facts/insider- Spider...
 -
 26 Feb 2019/3rd-week Tuesday. Why do you watch Oscar or why no? Time difference? I usually watch Oscars, but This time I missed the...